注意
前往結尾以下載完整的範例程式碼。
使用 ONNX 運算元
ONNX 旨在描述 scikit-learn 中實作的大多數機器學習模型,但它不一定以 scikit-learn 的方式描述預測函數。如果可以定義自訂運算元,通常需要一些時間將其新增至 ONNX 規格,然後再新增至用於計算預測的後端。最好先查看是否可以使用現有的運算元。該清單可在 github 上找到,並提供基本運算元和其他專用於機器學習的運算元。ONNX 具有 Python API,可用於定義 ONNX 圖:PythonAPIOverview.md。但它相當冗長,且難以描述大型圖。sklearn-onnx 實作了更好的方式來測試 ONNX 運算元。
ONNX Python API
讓我們嘗試 ONNX 文件提供的範例:使用輔助函數建立 ONNX 模型。它依賴於 protobuf,其定義可以在 github onnx.proto 上找到。
import onnxruntime
import numpy
import os
import numpy as np
import matplotlib.pyplot as plt
import onnx
from onnx import helper
from onnx import TensorProto
from onnx.tools.net_drawer import GetPydotGraph, GetOpNodeProducer

# Create one input (ValueInfoProto)
X = helper.make_tensor_value_info("X", TensorProto.FLOAT, [None, 2])

# Create one output (ValueInfoProto)
Y = helper.make_tensor_value_info("Y", TensorProto.FLOAT, [None, 4])

# Create a node (NodeProto)
node_def = helper.make_node(
    "Pad",  # node name
    ["X"],  # inputs
    ["Y"],  # outputs
    mode="constant",  # attributes
    value=1.5,
    pads=[0, 1, 0, 1],
)

# Create the graph (GraphProto)
graph_def = helper.make_graph(
    [node_def],
    "test-model",
    [X],
    [Y],
)

# Create the model (ModelProto)
model_def = helper.make_model(graph_def, producer_name="onnx-example")
model_def.opset_import[0].version = 10

print("The model is:\n{}".format(model_def))
onnx.checker.check_model(model_def)
print("The model is checked!")
The model is:
ir_version: 10
opset_import {
  version: 10
}
producer_name: "onnx-example"
graph {
  node {
    input: "X"
    output: "Y"
    op_type: "Pad"
    attribute {
      name: "mode"
      type: STRING
      s: "constant"
    }
    attribute {
      name: "pads"
      type: INTS
      ints: 0
      ints: 1
      ints: 0
      ints: 1
    }
    attribute {
      name: "value"
      type: FLOAT
      f: 1.5
    }
  }
  name: "test-model"
  input {
    name: "X"
    type {
      tensor_type {
        elem_type: 1
        shape {
          dim {
          }
          dim {
            dim_value: 2
          }
        }
      }
    }
  }
  output {
    name: "Y"
    type {
      tensor_type {
        elem_type: 1
        shape {
          dim {
          }
          dim {
            dim_value: 4
          }
        }
      }
    }
  }
}

The model is checked!
與 sklearn-onnx 相同的範例
每個運算元在 sklearn-onnx 中都有其自己的類別。此清單是根據已安裝的 onnx 套件動態建立的。
from skl2onnx.algebra.onnx_ops import OnnxPad  # noqa

pad = OnnxPad(
    "X",
    output_names=["Y"],
    mode="constant",
    value=1.5,
    pads=[0, 1, 0, 1],
    op_version=10,
)
model_def = pad.to_onnx({"X": X}, target_opset=10)

print("The model is:\n{}".format(model_def))
onnx.checker.check_model(model_def)
print("The model is checked!")
The model is:
ir_version: 5
opset_import {
  domain: ""
  version: 10
}
producer_name: "skl2onnx"
producer_version: "1.17.0"
domain: "ai.onnx"
model_version: 0
graph {
  node {
    input: "X"
    output: "Y"
    name: "Pa_Pad"
    op_type: "Pad"
    domain: ""
    attribute {
      name: "mode"
      type: STRING
      s: "constant"
    }
    attribute {
      name: "pads"
      type: INTS
      ints: 0
      ints: 1
      ints: 0
      ints: 1
    }
    attribute {
      name: "value"
      type: FLOAT
      f: 1.5
    }
  }
  name: "OnnxPad"
  input {
    name: "X"
    type {
      tensor_type {
        elem_type: 1
        shape {
          dim {
          }
          dim {
            dim_value: 2
          }
        }
      }
    }
  }
  output {
    name: "Y"
    type {
      tensor_type {
        elem_type: 1
        shape {
          dim {
          }
          dim {
            dim_value: 4
          }
        }
      }
    }
  }
}

The model is checked!
輸入和輸出也可以略過。
pad = OnnxPad(mode="constant", value=1.5, pads=[0, 1, 0, 1], op_version=10)

model_def = pad.to_onnx({pad.inputs[0].name: X}, target_opset=10)
onnx.checker.check_model(model_def)
多個運算元
讓我們使用文件中的第二個範例。
# Preprocessing: create a model with two nodes, Y's shape is unknown
node1 = helper.make_node("Transpose", ["X"], ["Y"], perm=[1, 0, 2])
node2 = helper.make_node("Transpose", ["Y"], ["Z"], perm=[1, 0, 2])

graph = helper.make_graph(
    [node1, node2],
    "two-transposes",
    [helper.make_tensor_value_info("X", TensorProto.FLOAT, (2, 3, 4))],
    [helper.make_tensor_value_info("Z", TensorProto.FLOAT, (2, 3, 4))],
)

original_model = helper.make_model(graph, producer_name="onnx-examples")

# Check the model and print Y's shape information
onnx.checker.check_model(original_model)
我們將其轉換為
from skl2onnx.algebra.onnx_ops import OnnxTranspose  # noqa

node = OnnxTranspose(
    OnnxTranspose("X", perm=[1, 0, 2], op_version=12), perm=[1, 0, 2], op_version=12
)
X = np.arange(2 * 3 * 4).reshape((2, 3, 4)).astype(np.float32)

# numpy arrays are good enough to define the input shape
model_def = node.to_onnx({"X": X}, target_opset=12)
onnx.checker.check_model(model_def)
讓我們使用 onnxruntime 輸出
def predict_with_onnxruntime(model_def, *inputs):
    import onnxruntime as ort

    sess = ort.InferenceSession(
        model_def.SerializeToString(), providers=["CPUExecutionProvider"]
    )
    names = [i.name for i in sess.get_inputs()]
    dinputs = {name: input for name, input in zip(names, inputs)}
    res = sess.run(None, dinputs)
    names = [o.name for o in sess.get_outputs()]
    return {name: output for name, output in zip(names, res)}


Y = predict_with_onnxruntime(model_def, X)
print(Y)
{'Tr_transposed0': array([[[ 0.,  1.,  2.,  3.],
        [ 4.,  5.,  6.,  7.],
        [ 8.,  9., 10., 11.]],

       [[12., 13., 14., 15.],
        [16., 17., 18., 19.],
        [20., 21., 22., 23.]]], dtype=float32)}
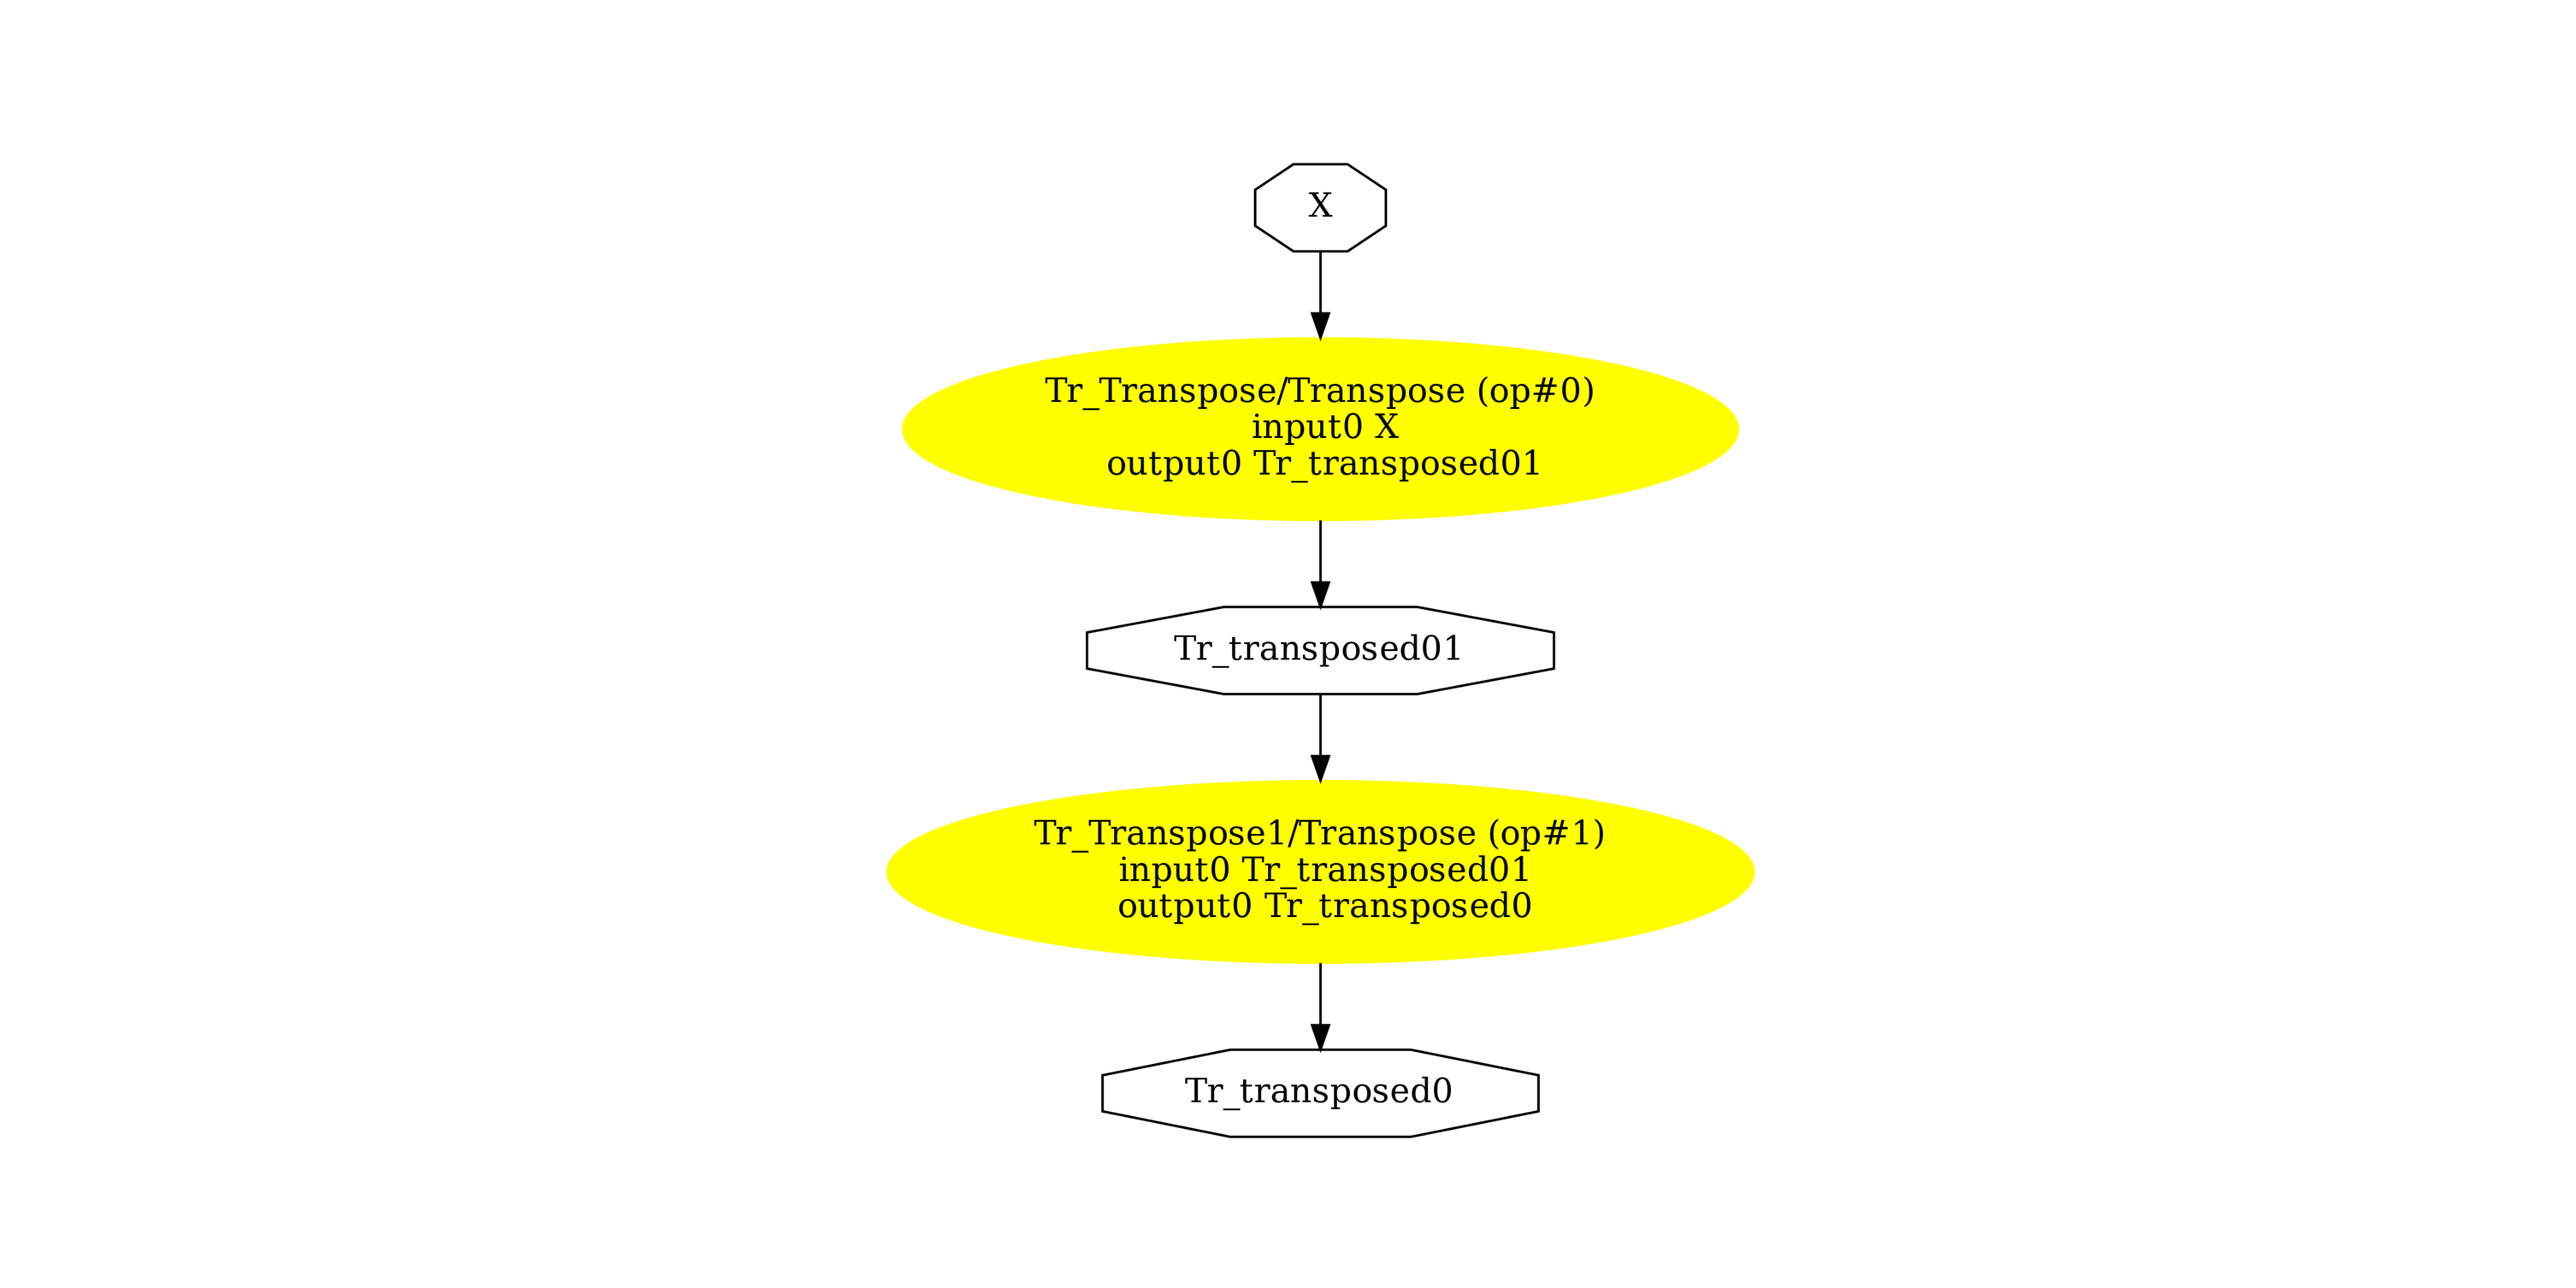
顯示 ONNX 圖
pydot_graph = GetPydotGraph(
    model_def.graph,
    name=model_def.graph.name,
    rankdir="TB",
    node_producer=GetOpNodeProducer(
        "docstring", color="yellow", fillcolor="yellow", style="filled"
    ),
)
pydot_graph.write_dot("pipeline_transpose2x.dot")

os.system("dot -O -Gdpi=300 -Tpng pipeline_transpose2x.dot")

image = plt.imread("pipeline_transpose2x.dot.png")
fig, ax = plt.subplots(figsize=(40, 20))
ax.imshow(image)
ax.axis("off")
(-0.5, 1524.5, 1707.5, -0.5)
此範例使用的版本
import sklearn  # noqa

print("numpy:", numpy.__version__)
print("scikit-learn:", sklearn.__version__)
import skl2onnx  # noqa

print("onnx: ", onnx.__version__)
print("onnxruntime: ", onnxruntime.__version__)
print("skl2onnx: ", skl2onnx.__version__)
numpy: 1.26.4
scikit-learn: 1.6.dev0
onnx:  1.17.0
onnxruntime:  1.18.0+cu118
skl2onnx:  1.17.0
腳本的總執行時間: (0 分鐘 0.882 秒)